Taking on the challenge of installing a roof yourself can be both rewarding and cost-effective. However, it requires careful planning, the right tools, and precise execution to ensure a safe and durable result. This guide will walk you through the essential steps for properly roofing your house on your own.
Assess Your Skills and Project Scope
- Experience Level: Have you worked on construction or roofing projects before?
- Project Size: Is this a simple repair or a complete roof replacement? For larger projects, hiring professionals may be more practical.
- Time Commitment: Roofing projects can take several days or weeks depending on weather conditions and complexity.
Plan Your Project
- Calculate the total square footage of your roof by multiplying its length by width for each section.
- Add extra material (10-15% more) to account for waste due to cuts and overlaps.
- Asphalt shingles (most common)
- Metal sheets
- Wood shakes
- Tile or slate
Each option has its own pros and cons in terms of durability, cost, and appearance. Research which material works best for your climate and budget.
- Check local building codes to ensure compliance.
- Secure necessary permits before starting work.
- Aim for dry weather conditions with minimal wind.
- Avoid working during rainy or extreme heat days.
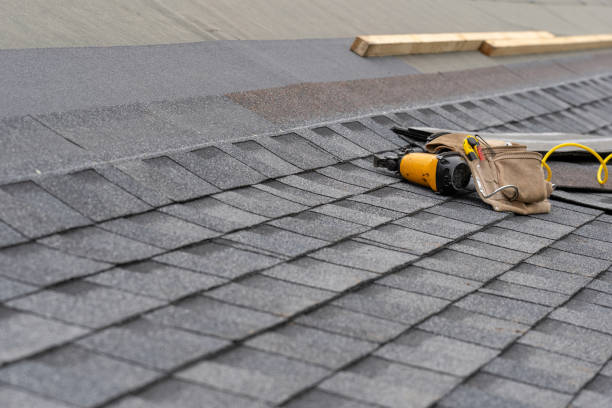
Gather Essential Tools & Materials
| Tools | Materials |
| Hammer or nail gun | Roofing nails |
| Utility knife | Shingles |
| Pry bar | Flashing |
| Chalk line | Underlayment |
| Ladder | Roof adhesive/sealant |
| Safety harness | Drip edge |
Prepare Your Work Area
- Clear debris from around the house.
- Set up scaffolding if needed for taller roofs.
- Ensure ladders are secure with proper angles (1 foot out for every 4 feet up).
Benefits of DIY Roof Installation
- Cost Savings: Eliminating labor costs can significantly reduce overall expenses.
- Flexibility: You can work at your own pace without time restrictions from contractors.
- Sense of Accomplishment: Completing such a substantial task brings satisfaction and pride in your skillset.
Roofing a house demands focus, preparation, and adherence to safety measures. By carefully following these guidelines, homeowners can achieve professional-quality results while managing costs effectively.
Step-by-Step Guide from a Roofing Contractor Manchester NH on Removing Old Shingles and Preparing Your Roof for Installation
Properly removing old shingles and preparing your roof is a critical step in ensuring the longevity and success of a new roof installation. Skipping or rushing through this process can lead to hidden issues down the line. Below is a detailed, professional guide to help you execute this task effectively.
1. Assess the State of Your Roof
- Water damage: Dark spots or sagging sections.
- Rotting decking: Weak areas that may need replacement.
- Structural issues: Warped or broken rafters.
This assessment helps determine whether additional repairs are necessary before moving forward.
2. Gather the Necessary Tools and Equipment
- Roofing shovel or pry bar: To remove old shingles efficiently.
- Hammer or nail puller: To extract nails from the decking.
- Heavy-duty gloves: To protect your hands from sharp edges.
- Trash chute or tarps: For collecting debris safely and reducing cleanup time.
- Hard hat
- Safety harness
- Non-slip roofing shoes
| Tool/Equipment | Purpose |
| Roofing shovel | Removing old shingles |
| Pry bar | Prying loose stubborn materials |
| Nail puller | Extracting nails from roof decking |
| Heavy-duty gloves | Hand protection |
3. Remove Existing Shingles
- Begin at the peak of the roof and work downward in small sections.
- Use a roofing shovel or pry bar to lift shingles gently, loosening nails as you go.
- Remove nails completely using a hammer claw or nail puller.
- Deposit removed shingles into a trash chute for proper disposal.
Take care not to damage underlying layers during removal, particularly if you plan to reuse any materials.
4. Inspect and Repair Roof Decking
- Look for rot, cracks, or weak spots in the roof decking (the wooden surface beneath).
- Mark damaged areas for repair using chalk.
- Replace any deteriorated decking with fresh plywood sheets secured firmly with nails.
Skipping this inspection may lead to structural risks that compromise your new installation.
5. Clean and Prepare Surface for Installation
- Sweep away any remaining debris using a stiff broom.
- Remove remnants of underlayment (felt paper) if necessary.
- Check for protruding nails; either hammer them flush into the decking or remove them entirely.
Optionally, apply an ice-and-water shield along valleys or eaves to ensure waterproofing in high-risk areas.
Tips for an Efficient Process
- Work with a partner to divide tasks—one person removes shingles while another manages cleanup.
- Avoid working on wet surfaces as this increases slip hazards.
- Plan your workday around weather conditions; high winds can make roofing dangerous.
By carefully following these steps, you’ll create a stable foundation ready for new roofing materials while minimizing future complications during installation processes such as shingle placement or flashing application.
Step-by-Step Guide by a Roofer Manchester NH on Removing Old Shingles and Preparing Your Roof for Installation
Removing old shingles and preparing the roof is a critical step in any roofing project. This process ensures that the new roof is installed on a clean, solid, and stable foundation. Below is a detailed guide to help you remove old shingles and properly prepare your roof.
Tools and Materials Needed
- Roofing shovel or shingle scraper
- Pry bar
- Hammer
- Roofing nails
- Ladder (secure and stable)
- Safety harness
- Tarp for debris collection
- Utility knife
- Broom or leaf blower (for cleaning debris)
Ensure all your tools are in good working condition before beginning. Having everything at hand will make the job more efficient.
Safety Precautions to Follow
- Use Fall Protection: Always wear a safety harness that’s securely anchored to reduce the risk of falls.
- Work During Good Weather: Avoid working in rainy, windy, or icy conditions as these can create slippery surfaces.
- Wear Proper Gear: Use gloves, non-slip shoes, goggles, and a hard hat for enhanced safety.
- Secure the Work Area: Keep children and pets away from the site to avoid accidents caused by falling debris.
Steps for Removing Old Shingles
- Start from the Top: Begin at the peak of your roof and work downward toward the edges for better control over shingle removal. This also prevents you from damaging areas you’ve already cleaned.
- Loosen Shingles with a Roofing Shovel: Insert your roofing shovel or flat pry bar under each shingle tab to loosen it from the nails holding it in place.
- Remove Roofing Nails: Use a hammer or pry bar to extract any visible nails as you remove shingles.
- Dispose of Debris Promptly: Place tarps on the ground near your ladder to collect shingles and nails as they’re removed, making cleanup easier later on.
- Inspect Underlayment: Once all shingles are gone, inspect the underlayment (felt paper) for damage such as tears or rot.
- Remove Flashing If Necessary: If flashing around chimneys, skylights, or vents is damaged or corroded, carefully remove it using a flat tool.
Preparing Your Roof for Installation
- Look for signs of rot, mold, or water damage on plywood decking.
- Replace any compromised sections before proceeding further.
- Attach drip edge along eaves to direct water runoff away from fascia boards.
- Roll out synthetic underlayment or felt paper evenly across the surface.
- Overlap each row according to manufacturer guidelines (usually 6 inches).
- Apply an ice & water shield membrane along valleys and eaves for extra protection against leaks during heavy snowmelt or rainstorms.
- Ensure everything is smooth and secure before moving on to install new shingles.
| Task | Tools Required | Key Considerations |
| Shingle Removal | Roofing shovel | Start at peak; remove all nails |
| Underlayment Check | None | Look for rot/damage & replace decking |
| Flashing Removal | Pry bar/flat tool | Remove only if damaged |
| Underlayment Install | Synthetic felt roll | Overlap rows properly |
Proper preparation enhances not only safety but also extends your roof’s lifespan significantly by creating a strong foundation free from hidden issues like moisture damage or weak structural elements.
Comprehensive Guide to Roof Installation Manchester NH: Shingles, Flashing, and Ventilation Systems
Proper installation of shingles, flashing, and ventilation systems is essential to ensure a durable, weather-resistant roof that protects your home. This guide provides detailed instructions for each step in the process to help you achieve professional-grade results.
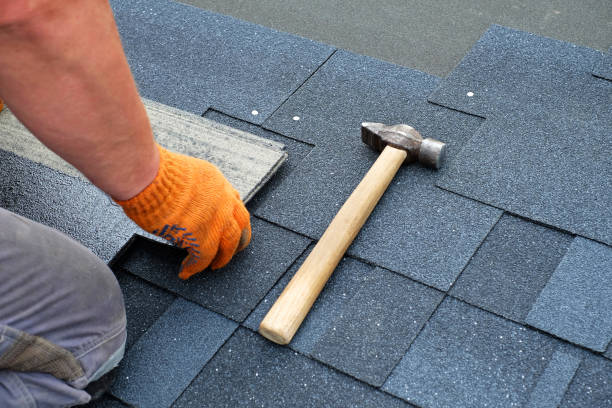
Installing Shingles: Step-by-Step Process
- Ensure that your roof deck is clean, dry, and free from debris before starting.
- Install an underlayment (felt paper or synthetic material) to provide an additional moisture barrier.
- Nail down drip edges along the eaves of the roof for water runoff.
- Secure them with roofing nails spaced about 10-12 inches apart.
- Place starter shingles along the edge of the roof to prevent water infiltration at the seams.
- Overlap sections slightly for consistent coverage.
- Start from the bottom edge of the roof and work upward in rows.
- Offset each row so that seams are staggered between adjacent rows (this is known as “staggering”).
- Use roofing nails to secure each shingle—typically four nails per shingle unless high-wind areas require additional reinforcement.
- Use a utility knife or roofing blade to cut shingles neatly around edges or valleys.
- Ensure cuts are precise to avoid gaps where water can seep through.
- Finish by installing ridge caps along peaks of your roof.
- These should overlap ridge vents if installed for added durability.
Installing Flashing: Preventing Leaks at Vulnerable Points
- Chimney Flashing:
Secure base flashing at the base of the chimney first, then install counterflashing on top to shed water effectively. - Step Flashing:
For areas where a vertical wall meets a sloped roof (like dormers), use step flashing: - Alternate layers of flashing with overlapping shingles for full coverage.
- Each piece of step flashing should extend at least four inches up the wall and four inches across the shingles.
- Valley Flashing:
Install valley flashing in roof valleys before laying shingles over it. This helps channel rainwater away efficiently.
Proper Ventilation Systems: Ensuring Roof Longevity
- Install Ridge Vents:
Ridge vents run along your roof’s peak and allow hot air to escape from your attic. They create continuous airflow when paired with soffit vents at lower points on your roof. - Add Soffit Vents:
These are installed under eaves and allow fresh air into your attic space:- Space them evenly along both sides of your home.
- Combine them with baffles inside attics to keep insulation from blocking airflow pathways.
- Use Box Vents or Turbines (if applicable):
If ridge vents aren’t feasible for your design, box vents or turbines can be installed instead:- Position them strategically near ridges for optimal heat release.
- Avoid clustering multiple vents too closely together as this can interrupt airflow patterns.
Pro Tip: Keep an Installation Checklist
| Component | Installed? (Y/N) | Notes |
| Underlayment | Ensure complete overlap | |
| Drip Edge | Secured every 10-12 in | |
| Starter Shingles | Properly aligned | |
| Field Shingles | Staggered patterns | |
| Flashing | Check edges/seams | |
| Ventilation Systems | Confirm proper airflow |
Adhering closely to these steps ensures that you not only enhance protection against weather elements but also increase energy efficiency while extending your roof’s lifespan significantly.
Comprehensive Guide to Roof Replacements Manchester NH: Installing Shingles, Flashing, and Ventilation Systems
Installing shingles, flashing, and proper ventilation systems is a crucial part of roofing that ensures the longevity of your roof and the comfort of your home. This guide walks you through each step with detailed instructions to help you achieve professional results.
Preparing for Shingle Installation
- Inspect the Roof Deck: Ensure the roof deck is dry, clean, and free from damage. Replace any rotten or warped decking.
- Install Drip Edge: Nail drip edge along the eaves and gable edges to direct water into gutters and protect the roof edges.
- Roll out synthetic or felt underlayment from bottom to top.
- Overlap rows by at least 6 inches to prevent water seepage.
- Secure the underlayment with cap nails every 12 inches.
Installing Shingles
- Lay a starter strip along the eaves to create a sealed edge.
- Overlap sections slightly and nail them every 6 inches.
- Begin at the bottom edge of the roof.
- Align shingles horizontally, leaving about ¼ inch overhang at edges and nails placed just below the adhesive strip.
- Stagger each row to prevent exposing seams directly beneath one another.
- Trim Excess Material: Use a utility knife or roofing shears to trim overhanging shingles along edges or ridges.
Installing Flashing
- Install metal flashing in roof valleys before laying shingles—secure it with roofing nails spaced every 12 inches.
- Apply step flashing around chimneys by layering metal pieces between each shingle course.
- Slide vent flashing beneath existing shingles while ensuring a watertight seal with roofing caulk.
Adding Proper Ventilation Systems
- Cut an opening along the ridge (if not pre-installed).
- Position ridge vents over openings and secure them with nails.
- Install soffit vents under eaves to allow fresh air intake into attics.
- Combine ridge vents with soffit vents for balanced airflow—a critical factor in prolonging your roof’s lifespan.
| Vent Type | Purpose | Key Advantage |
| Ridge Vents | Expels hot air from attic | Prevents overheating & moisture |
| Soffit Vents | Allows cool air intake | Improves airflow efficiency |
By following these steps effectively, you’ll ensure a weathertight installation that enhances both functionality and curb appeal of your home’s exterior structure. Take time during each phase for accurate measurements and proper alignment—it makes all the difference in creating a durable roof system that stands up to weather challenges over time.
- Comprehensive Cost Overview for Manchester NH Roofing and Roof Replacement in 2025
- 15 Steps to Choosing the Right Manchester NH Roofing Contractor for Your Home
- A Comprehensive Guide to Manchester NH Roofing: How to Properly Roof a House Yourself
- The Ultimate Guide to Choosing the Right Roofing Contractor Manchester NH for Your Needs
- Tips for Choosing the Best Roofer Manchester NH Has to Offer
- How to Identify When to Choose Roof Installation Manchester NH Over Repairs
- 7 Essential Tips for Choosing the Right Manchester NH Roofing Contractor for Your Home
- A Comprehensive Guide to Roof Installation Manchester NH: How to Know When It’s Time to Replace Your Roof